


Create a Billetto event to sell tickets

How to create an event on Facebook
Want to market your event on Facebook? There are a few ways to go about it.
The simplest one is to share a link to your event page (or website). If you’ve ever shared anything on Facebook - articles, Youtube videos, pictures - you already know exactly how this works.
A shared event page may look like this in the News Feed:

It’s quick and easy but also very limited.
You can’t directly decide what the link shows or how it looks. Plus a single link doesn’t allow for much interaction. People can click the link, comment, or “react” to it...and that’s about it.
If you want to step up your game, you should create a Facebook event for whatever you have coming up. This comes in two flavours...
- Creating an event using your personal Facebook profile.
- Creating an event via a Facebook page.
The only good reason to use first option is that it’ll let you set the event as “Private” and just invite specific people. But if that’s what you’re up to, you probably don’t need this guide on using Facebook for event promotion.
So let’s look at the other option: Creating an event via a Facebook page you manage.
Creating an event using a Facebook page
If you don’t already have a Facebook page for your business or brand, you want to set one up. It’s worth it, especially if you host regular events.
Once you have a Facebook page, the process of adding events to it is very similar to creating a personal Facebook event. We’ll go over that in a moment.
The big question is: Why do it in the first place?
Why you should create a Facebook event via a page
Using a Facebook page to create an event has many benefits. For instance:
1. More control
Setting up a Facebook event puts you in the driver’s seat and lets you control a number of things:
- Decide exactly what information and visuals appear when someone shares your event.
- Add co-hosts to the event (i.e. other Facebook pages or personal profiles).
- Control who’s allowed to post on the event wall.
2. Built-in features
Facebook provides built-in features for events you create on the platform, including:
- An event calendar you can embed on your own site.
- QR codes for offline promotion, linking people straight to your Facebook event.
3. Detailed insights
Facebook’s own insights are baked right in. They show plenty of useful stats about your marketing efforts like audience engagement, conversions, and more:

4. Better exposure and branding
Most importantly, creating a Facebook event via a business page gives you a lot of ways to promote your events and brand:
- Showcase your event(s) by moving the “Upcoming Events” section to the top of your business page or pinning an individual event as the top post.
- Use the event wall to continuously share related videos, photos, and posts.
- Go live from your Facebook event on the day it happens to stimulate more engagement.
- Gain extra visibility through Facebook automatically suggesting your event to potential guests.
- Insert a “Ticket URL” link to drive people to where you sell your tickets. This also lets you create Facebook ads that are optimised towards driving ticket sales. (We’ll soon have a separate guide about using Facebook ads for event promotion.)
Now let’s look at how you actually create an event on Facebook.
How to create an event tied to a Facebook page
There are two main ways to start creating a Facebook event for a specific page.
Option #1: Creating an event directly from the relevant Facebook page
1. Open your Facebook page.
2. Click "Event, Product +" in the status bar at the top.

3. Select "Create an event" from the list that opens.

4. Fill in the event details (see below for more info).
Option #2: Creating an event from the main Facebook view
1. Click on "Events" to the left of the News Feed.

2. Click on "Create Event" button on the left side of the page that loads.

3. Select "Create Public Event" from the dropdown (you want people to discover it).

4. In the "Event Host" dropdown, pick the Facebook page you want to associate with this event ("Billetto Organisers" in our example).

Whichever of the above paths you follow, you’ll then be asked to fill in your event details. For a hypothetical yoga event, it may look something like this:
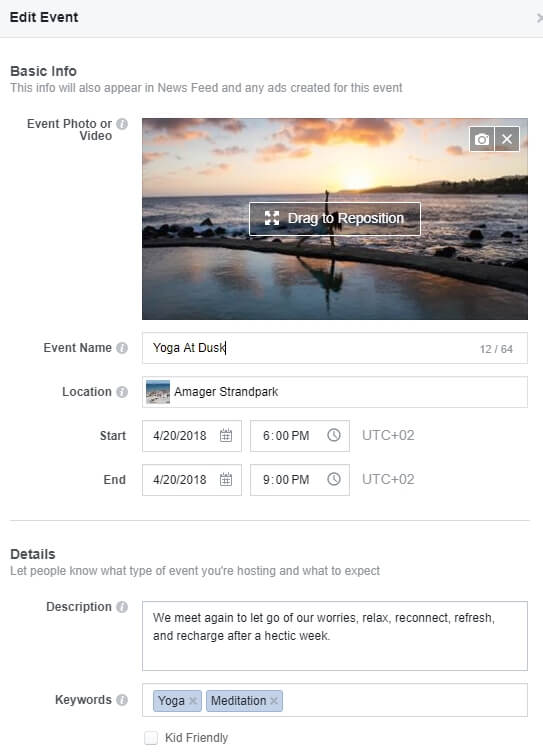
Let's look at the available fields and options:
Event Photo or Video
This will be the main image or video people see in their News Feed, etc.
Use a vibrant image that reflects your brand. Try to limit the amount of text in the banner. After all, people overwhelmingly use smartphones to browse Facebook. Don't make them squint to read your banner text.
If you’re stuck, sites like Canva let you create Facebook Event Covers using preset templates.
Have an event video teaser or footage from past events? Use that instead of a static visual as your event cover. Keep it short and make sure it only shows the most impressive highlights.
Event Name
Add a clear name for your event. You’re limited to 64 characters.
Location
This one’s vital. Make the location as specific as possible, down to the exact street address. This will automatically generate an interactive map and let people find directions with a single click.
As a bonus, Facebook uses this location to suggest your event to people looking for nearby events. So simply filling this out translates to free exposure.
Frequency
If it’s a one-off event, just leave the dropdown at the default “Occurs once” setting. Then simply fill out the date and time of your event.
If you’re hosting a series of repeating events, you can quickly set up a weekly/daily recurrence or select specific event dates. Doing so will save you a lot of time, as you won’t have to fill in the same event details for each occurrence.
Description
Use this to cover all essential details about the event, like the 5Ws (who, what, where, when, why). It’s a good idea to use #hashtags and @mentions to tag relevant people such as performers or co-hosts.
Keywords
Pick a couple of keywords that best describe your event. This again helps Facebook suggest it to relevant people. For our hypothetical example, we’ve used “Yoga” and “Meditation.”
Kid Friendly
Check this if you want to highlight that your event is suited for kids.
Ticket URL
If you’re selling tickets on a third-party site or page, this is where you insert a link to it. It’ll make “Find Tickets” link to appear prominently on your event:

Make sure the link takes people directly to where they can immediately start buying tickets.
Co-hosts
If you’re organising this event with other people, you can add their profiles or Facebook pages here. This lets them make changes to the event and promote it to their followers.
Posting
You have three options here:
- Anyone can post (reported posts must be approved). The most lenient option. All posts will be automatically published to the event wall, unless they’re reported by someone.
- Anyone can post (all posts must be approved). Select this if you want people to engage with the page while still maintaining control over which posts get published. (We recommend this option. It helps create buzz and chatter about your event but lets you block offensive or inappropriate posts.)
- Only hosts can post. Choose this if you want to use your event exclusively for communicating relevant details to your potential guests.
Guest List
The last option lets you hide the guest list, so that only you can see who’s attending. But we suggest leaving the “Display guest list” checkmark on. People are more likely to attend an event if they know who else is going - especially if their friends are there.
Once you’re happy with the event details, click the big blue “Create” button in the bottom right corner. (Or "Publish," if you've created an event directly from the Facebook page.)

That’s it - your event is now live!
Here, we even made a 3-minute video to show the whole process of creating an event on Facebook:
But getting the event published is just the start. Now you want the right people to find it.
How do you do that?
That’s the topic of our next chapter about Facebook ads for events.
